Tutorials:Lockable light switches
This tutorial provides a brief introduction to lockable light switches, based around the technique used in CoSaS Mission X.
Preamble
While Mission X may not have been the first FM to include the concept of locking light switches (ie: allowing a switch to be locked in the off or on position), it is certainly the most well-known, and the implementation it contains is one of the least object-intensive methods I know of. This tutorial provides instructions for replicating the technique in your missions.
Before implementing lockable switches in your mission, you should carefully consider both their appropriateness and the reaction of players to encountering them. Mission X has received a mix of praise and complaints related to these devices, mainly concerning their realism and appropriateness. While lockable light switches do actually exist (for example), and they are often used in public institutions and workplaces, I strongly suggest using them sparingly, and only in situations where it would make real sense to want to install such devices.
It should be noted that the instructions and techniques discussed in this tutorial are based on my reverse-engineering of the setup used in Mission X with some tinkering and cleanup. I can not claim any credit whatsoever for inventing this technique, I am simply documenting it for those in the community who may wish to place Mission X-style lockable switches in their missions.
Requirements
- NVScript 1.0.9 or later (use the latest version whenever possible!)
- A lockable light switch model. A normal light switch model will actually work without changes, but you'll need some way to make it visibly distinct. A new light switch model with an obvious lock extension is a good option here.
Setting up the archetypes
The first step is to ensure that the standard scripts and at least NVScript 1.0.9 are loaded and available (this was tested using NVScript 1.1.0m the latest version while writing). Creating the lockable light switches involves editing your gamesys, so make sure you are familiar with using the Object Heirarchy window and creating and editing entries in the trees before continuing.
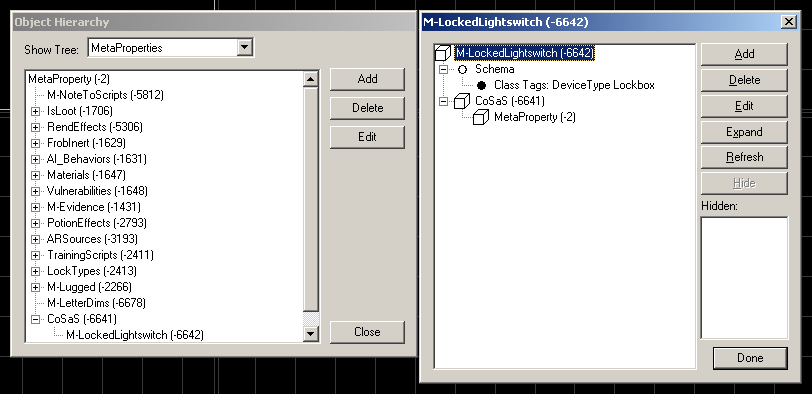
Now we need to create a new metaproperty so that we can change the sound the switch makes depending on whether it is locked or not (if it is locked, we want it to make the 'locked' sound made by lock boxes when frobbed, if it is not locked we want it to make normal light switch sounds). This is achieved by adding and removing a metaproperty that changes the switch's schema class tag depending on its lock status.
- Open the Object Heirarchy window.
- Change the
Show Treedropdown toMetaproperties. - Select
MetaPropertyand add an entry calledCoSaS. - Select
CoSaSand add an entry calledM-LockedLightswitch. - Select
M-LockedLightswitch, click Edit, and add the following properties:
Schema -> Class Tags
   DeviceType Lockbox
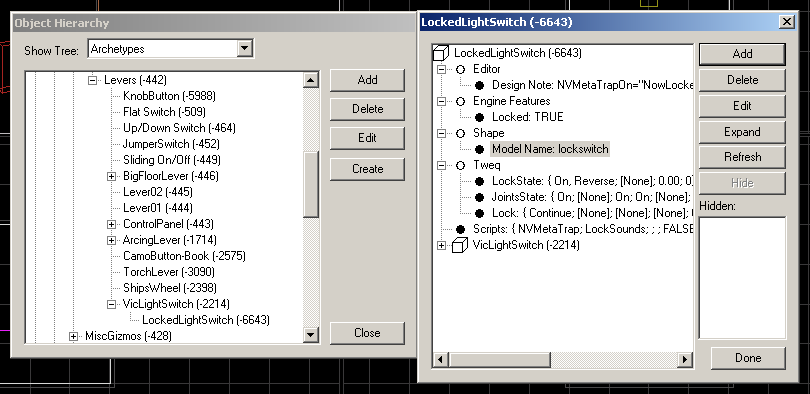
Now that the metaproperty is ready for use, we need to create the archetype for the switch. While you could just drop in a VicLightSwitch and add a number of properties, doing so is messy and error prone, so creating a new archetype entry helps avoid these problems. Note that the instructions given here assume that all the switches will be initially locked, if this is not the case, set the values of properties to the values shown in { } instead (or, better still, create separate UnlockedLightSwitch and LockedLightSwitch archetypes for either situation!)
- Change
Show TreetoArchetypes - Select
physical -> Gizmo -> Switches -> Levers -> VicLightSwitchand add an entry calledLockedLightSwitch - Select
LockedLightSwitch, click Edit and add the following properties:
Editor -> Design Node:
    NVMetaTrapOn="NowLocked"; NVMetaTrapOff="NowUnlocked"; NVMetaProperty="M-LockedLightswitch"

Engine Features -> Locked
    TRUE
    {FALSE}

Tweq -> LockState
   On, Reverse, [None], 0.00, 0
   {[None], [None], 0.00, 0}

Tweq -> JointsState
   On, [None], On, On, [None], [None], [None], [None]
   {[None], [None], [None], [None], [None], [None], [None], [None]}

Tweq -> Lock
   Continue, [None], [None], [None], 0, 0, 0, 0

Scripts
   NVMetaTrap;LockSounds;;;FALSE

Shape -> Model Name
   lockswitch  (or whatever your lightswitch model name is)
The lock behaviour is actually provided by the engine, the magic here is Nameless Voice's NVMetaTrap, which adds or removes the metaproperty M-LockedLightswitch when the switch is locked or unlocked.
Do not attempt to add the M-LockedLightswitch metaproperty to the archetype! If you do this, all concrete instances of the object in the world will always sound like lockboxes, evenwhen unlocked (the concrete objects inherit the metaproperty from the archetype, so while NVMetaTrap adds and removes the metaproperty from the object, the copy on the archetype is always there. While there are workarounds, just leaving the metaproperty off the archetype is the simplest solution!)
Once these changes have been made, be sure to save your gamesys (either save as a .cow, or save_gamesys and set_gamesys). This is most of the work done, but it's not wholly there yet - there are still a few things that need to be done when creating concrete objects in the world.
Creating LockedLightSwitch objects
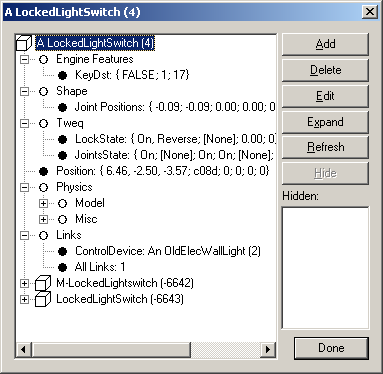
When you create a LockedLightSwitch in the world, before it can actually work properly you need to add a few more properties. First, create a new LockedLightSwitch in the world, select it, and bring up its properties. Now add the following properties to make it work:
 Engine Features -> KeyDst
     set as needed
Remember to add a key with the appropriate KeySrc somewhere in your mission if you want the lock to be unlockable! If you want the lock to be pickable, you should also add the following:
 Dark Gamesys -> PickCfg
     fill in the pick configuration as desired as you would for a normal lock.
If the switch is locked initially, you must also add the metaproperty to modify its sounds. To do this, add the following property via the object's properties window:
MetaProperty -> CoSaS -> M-LockedLightswitch
Now you can link your light switch to the device(s) it controls using normal ControlDevice links. While the switch is locked, no signals are sent over the ControlDevice links, only once the switch is unlocked will TurnOn and TurnOff signals be sent as normal.
| |||||||||||


