Scripting:AIBreathTutorial: Difference between revisions
No edit summary |
|||
| Line 15: | Line 15: | ||
* Click <code>Add</code> and enter the name <code>BreathProxy</code> | * Click <code>Add</code> and enter the name <code>BreathProxy</code> | ||
* Open <code>Object -> SFX -> GasFX</code> and select <code>RoboSteam</code> | * Open <code>Object -> SFX -> GasFX</code> and select <code>RoboSteam</code> | ||
* Click <code>Add</code>and enter the name <code>AIBreath</code> | * Click <code>Add</code> and enter the name <code>AIBreath</code> | ||
* Select <code>AIBreath</code> and click <code>Edit</code> | * Select <code>AIBreath</code> and click <code>Edit</code> | ||
* Add <code>SFX -> Particle Launch Info</code> | * Add <code>SFX -> Particle Launch Info</code> | ||
Latest revision as of 10:49, 25 June 2020
Setting up the TWTrapAIBreath system is fairly simple, but it's important to note that directly attaching the particles to the AI will produce very odd-looking particle behaviour: you must use an intermediary marker as a detail attachment and attach the particles to that proxy object if you want the particles to behave sensibly.
You can find a complete example of this setup in the TWScriptDemo mission files, including the fpuff.tga file needed for the particles.
Obviously before you begin you should make sure that TWScript is loaded in your FM, or you'll end up with AIs constantly breathing out steam wherever they go!
| The settings given here are only 'typical' examples - you should expect to need to tweak them to match the 'feel' of your FM and your own preferences. You may find it easier to fiddle with the settings on the AIs in the demo mission, and then copy the settings across into your own. |
| While this system has been tested on a small scale, it has not yet been deployed across a mission with dozens of AIs using the setup. I've tried to minimise the overhead of the script as much as possible, but if you have a very large number of AIs using this script, it may have performance implications - please tell me how it goes! |
BreathProxy and AIBreath
The first step to setting up the system is to create the breath proxy marker and particle archetype:
- Open the Object Hierarchy
- Open
Object -> fnordand selectMarker - Click
Addand enter the nameBreathProxy - Open
Object -> SFX -> GasFXand selectRoboSteam - Click
Addand enter the nameAIBreath - Select
AIBreathand clickEdit - Add
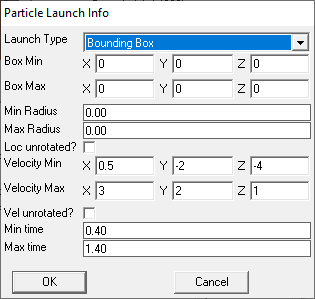
SFX -> Particle Launch Info - Enter the following settings and click
OK
- Add
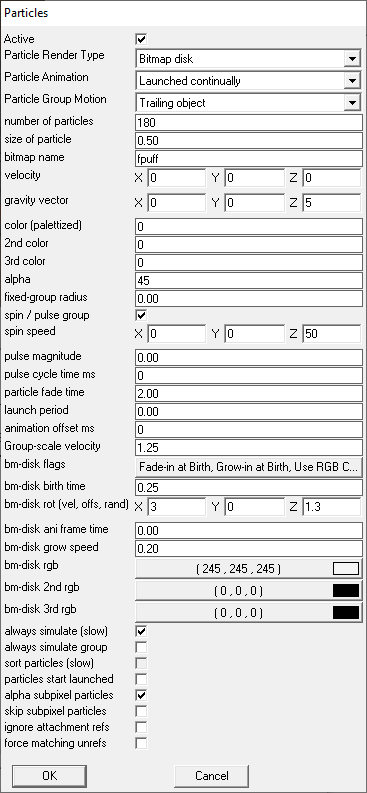
SFX -> Particles - Enter the following settings and click
OK(note thatAlways simulateseems to be forced byTrailing Object!)
- Finally add
Links -> ParticleAttachementand set the link to go fromAIBreathtoBreathProxy(Note this should beParticleAttachement, not~ParticleAttachement)
AI Setup
Next you need to either modify existing AIs to add the TWTrapAIBreath setup, or create new archetypes of each AI that needs to have the system applied. It's likely that any AI that chases the player may end up being drawn into a cold area, so arguably you could add the necessary elements to physical -> Creature -> Animal -> Human, but there are no free Script slots on that archetype. The following gives instructions for modifying the existing guard archetype - you may want to add the modifications to the other Human subobjects:
- Select
Object -> physical -> Creature -> Animal -> Human -> guardand clickEdit - Add
Editor -> Design Noteand set the design note to, for example:
TWTrapAIBreathColdRooms=Outside;TWTrapAIBreathExhaleTime=600- Select
Scriptsand clickEdit - Add
TWTrapAIBreathto the list of scripts - Add
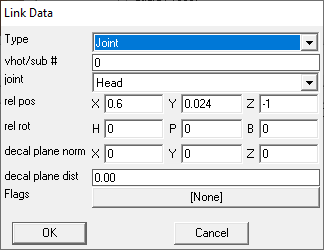
Links -> ~DetailAttachementand make the link go fromguardtoBreathProxy - Edit the data for the newly added link, and set the values to the following - this should place the
BreathProxyobject in front of the face of most AIs:
Room setup
Now you have AIs that will have visible breath when they are in any room that is an instance of the the Outside room archetype:
- Open the Object Hierarchy
- From
Show TreeselectRooms - Select
Base Room -> Default Room - Click
Addand enter the nameOutside - Click
Create - Start placing your outside rooms.
If you want to use several different 'outside' room archetypes, just make sure you add the names to the TWTrapAIBreathColdRooms parameter in the design note.
With everything set up, you can place your AIs as normal and they will pick up the script and detail attachment automatically - if you are retrofitting an existing FM with the system, you will need to either delete and remake your existing AIs, or manually add the necessary BreathProxy object and DetailAttachement links for each.
| |||||||||||||||||
| |||||||||||


